This article is the ninth in our series of white papers on radiologic patient positioning techniques for x-ray examinations. If you'd like to comment on or contribute to this series, please e-mail [email protected].
One of the earliest x-ray images ever produced by Wilhelm Conrad Roentgen was of his wife Bertha’s hand. Since that November day in 1895, the technological options for hand imaging have evolved to include most of the major radiographic modalities.
However, the x-ray of the hand is still the frontline tool used for diagnostic purposes. Obtaining a quality radiographic image requires a combination of proper technique and attention to patient positioning.
General procedures for upper-limb positioning
- Remove rings, watches, and other radiopaque objects.
- Seat the patient at the side or end of the table and place the cassette at a location and angle that allows the patient to be in the most comfortable position.
- Direct the central ray (CR) at a right angle to the midpoint of the cassette.
- When performing a bilateral examination of hands or wrists, separately radiograph each side.
- Shield the patient’s gonads from scattered radiation.
- Use close collimation. This technique is recommended for all upper-limb radiographs.
- When placing multiple exposures on one cassette, the side of the unexposed cassette should always be covered with lead.
- Use right or left markers and any other vital identification markers when appropriate.
 |
First digit (thumb)
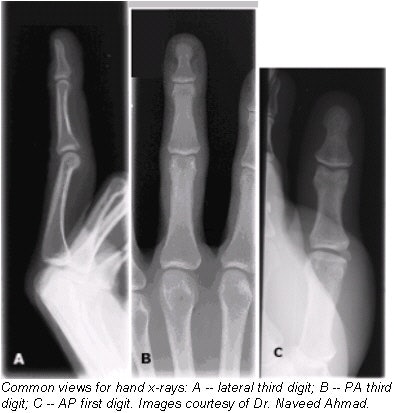
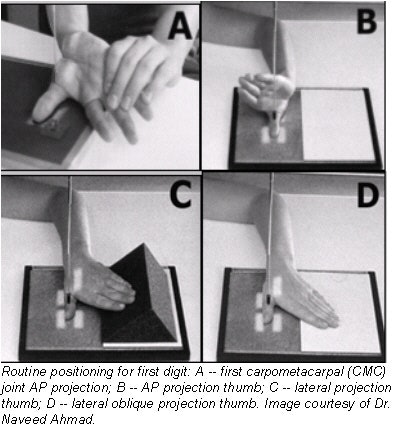
Positioning of the thumb is unique because its axis differs from that of the other digits. Basic views of the thumb include anteroposterior (AP), posteroanterior (PA), oblique, and lateral. Stress views of the first metacarpophalangeal (MCP) articulation may be required for evaluation of injuries of the ligaments of this joint.
Technical factors
- Image receptor (IR): 8 x 10 inch (18 x 24 cm) crosswise for two or more images on one cassette.
- Digital IR (use lead masking).
- Detail screen, table top.
- 50-60 kVp range, cm 3, mAs 3, Sk 10, ML 10.
- Position: Seat the patient at the end of the radiographic table with their arm internally rotated.
Positioning technique for an AP projection
- Put the patient’s hand in a position of extreme internal rotation with the least amount of strain on the arm.
- Have the patient hold the extended digits back with tape or the opposite hand. Rest the thumb on the cassette. If the elbow is elevated, place a support under it and have the patient rest their opposite forearm against the table for support.
- Center the long axis of the thumb parallel with the long axis of the cassette. Adjust the position of the hand to ensure a true AP projection of the thumb.
- Place the fifth metacarpal back far enough to avoid superimposition.
Positioning technique for a lateral projection
- Place the hand in its natural arched position with the palmar surface down and fingers flexed or resting on a sponge.
- Place the midline of the cassette parallel with the long axis of the digit. Center the cassette to the MCP joint.
- Adjust the arching of the hand until a true lateral position of the thumb is obtained.
 |
Positioning technique for a PA oblique projection
- With the thumb abducted, place the palmar surface of the hand in contact with the cassette. Ulnar deviate the hand slightly. This relatively normal placement positions the thumb in the oblique position.
- Align the longitudinal axis of the thumb with the long axis of the cassette. Center the cassette to the MCP joint.
Positioning technique for the first MCP joint
- Extend the limb straight out on the radiographic table and rotate the arm internally; this places the posterior aspect of the thumb on the cassette with the thumbnail down.
- Place the thumb in the center of the cassette.
- Hyperextend the hand so that the soft tissue over the ulnar aspect does not obscure the first CMC joint. This ensures that the thumb is not oblique.
Central ray
- The CR should be perpendicular to the MCP joint for the AP, lateral, and oblique projections. Collimate to include entire first digit.
- For the first carpometacarpal (CMC) joint AP projection, the CR should be perpendicular, entering at the first CMC joint. However, CR angulation of 10° -15° proximally along the long axis of the thumb and entering the first CMC or MCP joint helps to project the soft tissue of the hand away from the first CMC joint, and open the joint space.
Evaluation criteria
- The area from the distal tip of the thumb to the trapezium should be clearly demonstrated.
- There should be no rotation, and concavity of the phalangeal and metacarpal shafts should be demonstrated with equal amounts of soft tissue on both sides of the phalanges.
- In the first CMC joint radiograph:
- The first CMC joint should be free of superimposition of the hand or other bony elements.
- The first metacarpal and trapezium should be clearly demonstrated.
- There should be open interphalangeal and MCP joint spaces.
- The soft tissue and bony trabeculation should be clearly present.
Digits (second through fifth)
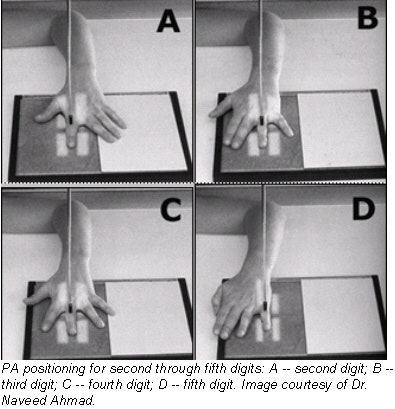
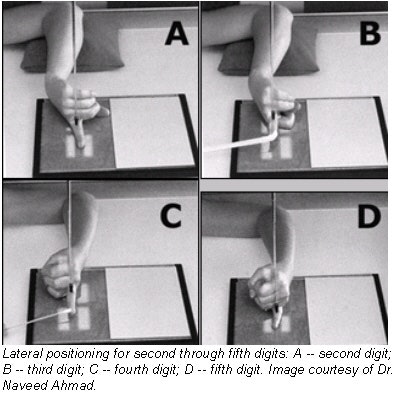
Adequate radiographic evaluation of the fingers requires PA and lateral projections. The particular position employed for obtaining a lateral radiograph of one of the four ulnar (medial) digits will depend on the specific digit being examined. Placing the hand on a step wedge permits separation of individual fingers in the lateral projection, allowing all digits to be examined on a single radiograph.
PA projection -- technical factors
- IR: 8 x 10 inch (18 x 24 cm) crosswise for two or more projections on one cassette.
- Digital screen, use lead masking.
- Detail screen, table top.
- 50- 60 kVp range, mAs 2, cm 2, Sk 6, ML 6.
Patient position
Seat the patient at the end of the radiographic table.
Positioning technique
When imaging individual digits (except the first), take the following steps:
- Place the extended digit with the palmar surface down on the unmasked portion of the cassette.
- Separate the digits slightly, and center the digit under examination to the midline portion of the cassette. Center the proximal interphalangeal (PIP) joint to the cassette.
- For computed radiography the digit must be placed in the central area of the cassette for all finger projections.
 |
Central ray
The CR should be perpendicular to the PIP joint of the affected digit. Collimate to the digit under examination.
Evaluation criteria
- To ensure no rotation of the digit concavity of the phalangeal shafts, an equal amount of soft tissue on both sides of the phalanges should be clearly demonstrated.
- The entire digit, from fingertip to distal portion of the adjoining metacarpal, should be clearly demonstrated.
- There should be no soft-tissue overlap from adjacent digits.
- The interphalangeal and MCP joint should be open without overlap of bones.
Lateral projection -- technical factors
- IR: 8 x 10 inch (18 x 24 cm) crosswise for two or more images on one cassette.
- Digital screen, use lead masking.
- Detail screen, table top.
- 50-60 kVp range, mAs 2, cm 2 , Sk 6, ML 6.
Patient positioning
Seat the patient at the end of the radiographic table
Positioning technique
- Because lateral digit positions are difficult to hold, demonstrate the position with your own finger to the patient.
- Ask the patient to extend the digit to be examined. Close the rest of the digits into a fist, and hold them in complete flexion with the thumb.
- Have the patient’s hand rest on the radial surface, for the second or third digits, or on the ulnar surface for the fourth and fifth digits.
- If the elbow is elevated, place a support under it and have the patient rest their opposite forearm against the table for support.
- Place the cassette so that the midline of its unmasked portion is parallel with the long axis of the digit. Center the cassette to the PIP joint.
- When imaging the second and fifth digits, rest them directly on the cassette. Use a radiolucent sponge if needed to support the digits.
- When imaging the third and fourth digits, elevate them and place their long axes parallel with the plane of the cassette. Use a radiolucent sponge if needed to support the digits.
- Place a strip of adhesive tape, as needed, to immobilize the extended digit against the palmar surface.
- Obtain a true lateral position of the digit by adjusting the anterior or posterior rotation of the hand.
 |
Central ray
The central ray should be perpendicular to the PIP joint of the affected digit. Collimate to the digit being examined.
Evaluation criteria
- The entire digit should be clearly demonstrated in a true lateral position with no rotation.
- The fingernail should be in profile and the anterior surfaces of the phalanges should be concave.
- There should be no obstruction of the proximal phalanx or MCP joint by adjacent digits.
- The interphalangeal and MCP joint should be open.
AuntMinnie.com contributing writer
September 17, 2002
Related Reading
Patient positioning techniques for a lower gastrointestinal series, June 27, 2002
Patient positioning tips for a premium UGI series, April 17, 2002
Positioning techniques for quality esophagrams, March 20, 2002
Dorsal and lateral decubitus patient positioning for abdominal x-ray exams, February 28, 2002
AP abdominal projection x-ray positioning techniques, January 16, 2002
Copyright © 2002 AuntMinnie.com


