This is the 12th in our series of white papers on radiologic patient positioning techniques for x-ray examinations. If you'd like to comment on or contribute to this series, please e-mail [email protected].
Radiographic positioning of the shoulder (glenohumeral joint)
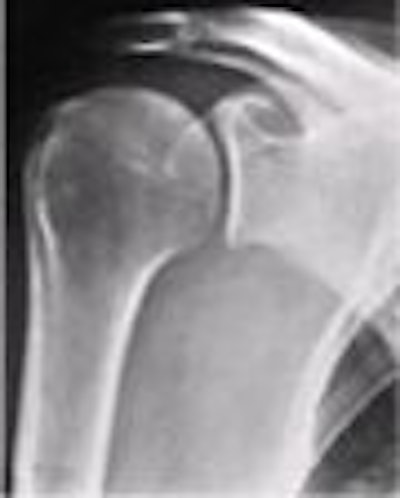
Radiographic examination of the shoulder area includes evaluation of the shoulder girdle (clavicle and scapula) and the joints of the shoulder girdle (glenohumeral, acromioclavicular, and sternoclavicular). In a non-trauma patient, the radiographic examination of the glenohumeral joint includes rotational views of the proximal humerus. The AP (internal and external rotation) projections satisfactorily demonstrate pathology such as degenerative joint disease (DJD) and calcifications.
In a trauma patient, the shoulder area can be sufficiently evaluated on the AP projection, either with the arm in the neutral position, or with the arm internally or externally rotated. The one limitation of these views is that the humeral head is seen overlapping the glenoid, thereby obscuring the glenohumeral joint space.
An additional radiograph at approximately right angles to the frontal radiographs is mandatory to determine the relative positions of the humeral head and glenoid. This can be accomplished via an AP oblique, scapular Y (PA oblique position), axillary, or transthoracic projection.
Technical factors
- Image receptor (IR): 8 x 10 inch (18 x 24 cm).
- 60 to 70 kVp range, mAs 6.
- Minimum SID of 40 inches (100 cm).
Positioning for an AP projection of the shoulder joint
- Have the patient upright or in the supine position. The upright position should be used in shoulder-trauma patients whenever possible to avoid movement and pressure.
- Center the shoulder joint to the midline of the grid.
- Adjust the position of the cassette so that its center is 1 inch (2.5 cm) inferior to the coracoid process. The coracoid process is about 2 cm inferior to the lateral portion of the palpable clavicle.
- Position the arm in the external, internal, or neutral rotation.
- If necessary to overcome the curve of the back and the resultant obliquity of the shoulder structures, slightly rotate the patient enough to place the body of the scapula parallel with the plane of the cassette.
- Suspend respiration during the exposure.
- The central ray (CR) should be perpendicular to a point 1 inch (2.5 cm) inferior to the coracoid process.
External rotation
The external rotation represents the true AP projection of the humerus. Supinating the hand will position the humerus in the external rotation and places the epicondyles of the humerus parallel to the IR. With the external rotation view, the greater tubercle is positioned in profile laterally and the lesser tubercle is located anteriorly.
Ask the patient to extend the arm. Abduct and slightly rotate the arm and elbow externally until the palm of the hand is forward (supinate hand) and the epicondyles of the distal humerus are parallel to the plane of the cassette.
 |
| Reprinted from Merrill’s Atlas of Radiographic Positions and Radiologic Procedures, 9th edition, Ballinger and Frank, page 161 (table 5-2), copyright 1999 Mosby, with permission from Elsevier Science. |
Internal rotation
The AP projection of the shoulder taken in internal rotation position shows a lateral position of the humerus. The lesser tubercle is seen medially in profile, whereas the greater tubercle is seen rotated anteriorly.
In order to position the shoulder in internal rotation, the posterior aspect of the hand is placed against the hip. This can be done by abducting the extending arm slightly, then internally rotating the arm (pronate hand) until the epicondyles of the distal humerus are perpendicular to the plane of the cassette.
Neutral rotation
The neutral rotation AP projection of the shoulder is taken on a trauma patient when rotation views cannot be accomplished.
In order to position the shoulder in neutral position, ask the patient to rest the palm of the hand against their hip. This arm position rolls the humerus into a neutral position, placing the epicondyles at an angle of about 45° to the plane of the cassette.
 |
| Reprinted from Merrill’s Atlas of Radiographic Positions and Radiologic Procedures, 9th edition, Ballinger and Frank, page 163 (figure 5-14), copyright 1999 Mosby, with permission from Elsevier Science. |
Evaluation criteria for an AP projection
Positioning for an AP oblique projection of the shoulder joint
The AP projections of the shoulder joint have the limitation of not being able to demonstrate the glenohumeral joint space. The humeral head is seen overlapping the glenoid in the AP projections, thereby obscuring the glenohumeral joint space. Eliminating this overlap can be accomplished by obtaining an AP oblique projection. This special view is known as a Grashey projection.
- Have the patient in a supine or upright position. The upright position is more comfortable for the patient and facilitates accurate adjustment of the shoulder.
- Center the cassette to the glenohumeral joint.
- Rotate the body approximately 35°- 45° toward the affected side.
- Abduct the arm slightly in internal rotation and place the palm of the hand on the abdomen, if possible.
- Adjust the degree of rotation to place the scapula parallel with the plane of the cassette. This allows the head of the humerus to be in contact with the cassette.
- If the patient is in the supine position, the body may need to be rotated more than 45° to place the scapula parallel to the cassette.
- If the radiograph is done with the patient in the supine position, place supports under the elevated shoulder and hip to maintain position.
- The CR should be perpendicular to the glenoid cavity at a point 2 inches (5 cm) inferior to the superolateral border of the shoulder.
 |
| Reprinted from Merrill’s Atlas of Radiographic Positions and Radiologic Procedures, 9th edition, Ballinger and Frank, page 164 (figure 5-15), copyright 1999 Mosby, with permission from Elsevier Science. |
Evaluation criteria
- The glenoid cavity should be seen in profile without superimposition of the humeral head.
- The glenohumeral joint space should be open.
- The anterior and posterior rims of the glenoid cavity are superimposed.
Positioning for the scapular Y projection of the shoulder joint
This projection obtains its name as a result of the appearance of the scapula. The body of the scapula forms the vertical component of the Y, while the acromion and coracoid processes form the upper limbs of the letter.
This projection is useful in the evaluation of suspected shoulder dislocations. In a normal shoulder, this projection shows the humeral head directly superimposed over the junction of the Y. In anterior dislocations, the humeral head is beneath the coracoid process; in posterior dislocations, it is projected beneath the acromion process.
- Position the patient in an erect or recumbent position; the upright position is preferred.
- Position the anterior surface of the shoulder being examined against the upright table.
- Rotate the patient into an anterior oblique position, as for a lateral scapula, with the patient facing the cassette. An average patient would form an angle of 45°- 60° to the cassette.
- Palpate the scapular borders to determine the correct rotation for a true lateral position of the scapula.
- Position the center of the cassette at the level of the glenohumeral joint.
- If the patient is severely injured, modify the anterior oblique by placing the patient in the posterior oblique position.
- The CR should be perpendicular to the glenohumeral joint.
 |
Evaluation criteria
- The scapula should be clearly demonstrated in the lateral profile.
- The thin body of the scapula should be seen on end without rib superimposition.
- The acromion and coracoid processes should appear as nearly symmetric upper limbs of the Y.
- The humeral head should appear superimposed over the base of the Y if the humerus is not dislocated.
Positioning for the transthoracic lateral projection of the shoulder joint
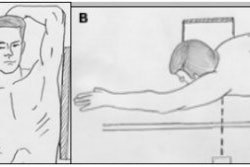
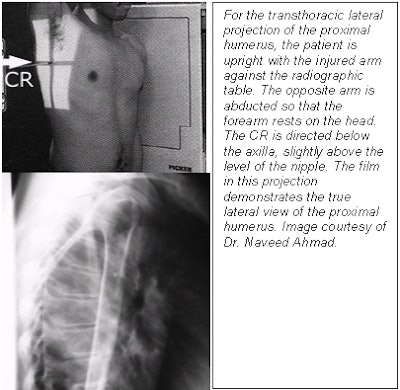
Suspected trauma to the proximal humerus may require a transthoracic lateral view for sufficient evaluation. This projection provides a true lateral view of the proximal humerus. If the arm cannot be rotated or abducted, this view is particularly valuable in determining the degree of displacement or angulation of the bony fragments.
- Have the patient raise the uninjured arm and place their hand over the top of their head, elevating the shoulder as much as possible. Elevating the uninjured shoulder drops the injured side, separating the shoulders to prevent superimposition.
- Center the cassette to the surgical neck area of the effected humerus. Ensure that the thorax is in a true lateral position.
- Ask the patient to hold their breath at full inspiration. This improves the contrast and decreases the exposure. However, if the patient can cooperate, a breathing technique is preferred in order to blur the overlying ribs. The patient is asked to practice slow, deep breathing while preventing any voluntary motion.
- The CR should be perpendicular to the cassette, entering midcoronal plane at the level of the surgical neck. However, if the patient cannot elevate the unaffected shoulder, angle the CR 10°-15° cephalad.
 |
Evaluation criteria
- The lateral view of the humerus and glenohumeral joint should be visualized through the thorax without the superimposition of the opposite shoulder.
- The outline of the shaft of the proximal humerus should be clearly visualized anterior to the thoracic vertebrae. There should be no arm motion during exposure.
- The overlying ribs and lung marking should appear blurred because of breathing technique.
- The relationship of the humeral head and glenoid cavity should be demonstrated.
Positioning for an axillary projection of the shoulder joint
A superioinferior view of the shoulder, known as the axillary projection, is helpful for determining the exact relationship of the humeral head and the glenoid fossa, and for detecting anterior and posterior dislocation. This view can be difficult to obtain, however, especially if the patient is unable to abduct the arm, in which case a variant of the axillary projection, known as the West Point axillary view, may be similarly effective.
- As mentioned above, before undertaking this position, verify the patient’s ability to abduct the arm to a nearly right angle to the long axis of the body.
- Seat the patient at the end of the table on a stool or chair.
- Place the cassette near the end of the table and extend the patient’s shoulder under the examination well and over the cassette.
- Center the shoulder to the midline of the cassette by having the patient lean over the cassette.
- Flex the patient’s elbow 90° and place their hand in the prone position.
- The CR should be angled 5°-15° through the shoulder joint and toward the elbow.
Evaluation criteria
- The coracoid process is seen projecting above the clavicle.
- The lesser tubercle is clearly demonstrated in profile.
- The acromioclavicular joint is seen through the humeral head.
- There is an open glenohumeral joint (this is not open in patients with limited flexibility)
To obtain a West Point axillary view, the patient lies prone on the radiographic table with a pillow placed under the affected shoulder to raise it about 3 inches (8 cm). The film cassette is positioned against the superior aspect of the shoulder. The CR is angled toward the axilla at 25° to the patient’s midline, and at 25° to the table’s surface.
By Dr. Naveed AhmadAuntMinnie.com contributing writer
December 24, 2002
Related Reading
The bends and flexures of forearm and elbow x-ray positioning, November 21, 2002
The twists and turns of hand and wrist x-ray positioning, October 15, 2002
Digit imaging requires diligent positioning, September 17, 2002
Patient positioning techniques for a lower gastrointestinal series, June 27, 2002
Patient positioning tips for a premium UGI series, April 17, 2002
Copyright © 2002 AuntMinnie.com


