This article continues our series of white papers on radiologic patient positioning techniques that appear each month on AuntMinnie.com. The series will explore each of the major modalities. If you’d like to comment on or contribute to this series, please e-mail [email protected].
Chest x-ray AP positioning techniques
Anteroposterior (AP) chest radiographs can be made in the intensive care unit, the operating suite, or the patient’s room using mobile equipment. They are often known as a portable film when performed with a mobile unit. They are generally of lesser quality than a posteroanterior (PA) radiograph or recumbent films made in the radiology department. Hence, it is preferable to obtain a film in the radiology department unless the patient cannot be moved without hazard.
Patient preparation
Ask the patient to remove clothes from the waist up, put on a hospital gown, remove any jewelry (necklace, earrings), and, if necessary, tie hair up on top of the head.
Patient position considerations
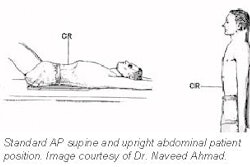
Instruct the patient to lie supine or upright, with the back against the grid. If the patient’s condition allows, raise the head end of the cart, as the semi-erect position will improve the anatomical details.
Positioning is difficult in a hospital bed, thus the patient’s true position is often unknown, which causes difficulty in assessing pulmonary vascularity or the presence of pleural fluid. If a portable film must be done, an upright portable film is preferable to a supine film. The patient’s position and the distance from the x-ray tube to the film should be recorded on the film cassette.
Position of chest
- The midsagittal plane of the chest should be in the center of the cassette.
- If the patient’s condition allows, ask the patient to relax the shoulders and place hands on hips (to move the scapula away from the lung fields).
- Place a lead shield between the x-ray tube and the patient’s pelvis for gonadal protection.
- If the patient cooperates, instruct him or her to take a deep breath and then hold it to fully aerate the lungs. The patient should then take a second deep breath. (This allows for a deeper inspiration, as more air is inhaled during the second breath.) The exposure is made at the end of the second full inspiration to ensure maximum expansion of the lungs.
Film holder placement
For AP chest radiographs, the recommendation is to place the cassette film holder or image receptor (IR) crosswise, not lengthwise, using a 14 x 17-inch (35 x 43-cm) IR. Place the IR behind or underneath the patient. The lengthwise use of the IR can cut off the side borders of the lung fields. The cassette should be adjusted so that the upper border is approximately 1 1/2 to 2 inches (3.8-5 cm) above the shoulders.
Central ray
The central ray (CR) is set perpendicular to the long axis of the sternum and the center of the cassette. The jugular notch is the recommended landmark for the location of the CR for AP chest radiographs. The notch is used for locating the center of the lung fields at the T7 level (mid-thorax).
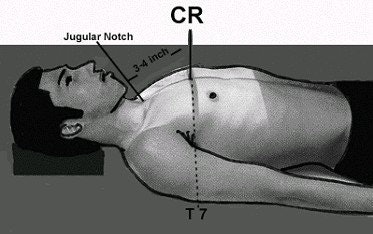 For an AP chest radiograph, the landmark used for positioning the central ray (CR) is at T7 (mid-thorax). The level of T7 is 3-4 inches (8-10 cm) below the jugular notch. Image courtesy of Dr. Naveed Ahmad. Reprinted from Merrill’s Atlas of Radiographic Positions and Radiologic
Procedures, 9th edition, Ballinger and Frank, page 58 (figure 10-52), copyright 1999 Mosby, with permission from Elsevier Science.
The T7 level on an average adult is 3-4 inches (8-10 cm) below the jugular notch. For older or thinly built patients it is 3 inches (8 cm) below the jugular notch, and for patients with athletic physiques it can be as much as 5 inches. This distance can be estimated by using your hand. The average-size hand, with fingers together, is approximately 3 inches. In patients with kyphosis, a slight cephalad angulation may be needed.
Collimation
The upper border of the illuminated field should be above the shoulders and on each side. It should correspond to the outer skin margins.
Imaging technique
- Film size: 14 x 17 (35 x 43 cm) crosswise
- Exposure: 110-125 kVp range
- mAs: 1.7
- cm: 22
- ML : 2
Evaluation criteria for a good AP projection
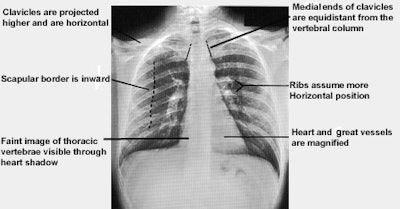
- The entire lung fields from apices to the costophrenic angles should be clearly demonstrated.
- No rotation -- the sternal ends of the clavicle should be at the same distance from the center line of the spine. However, in portable radiographs it is sometimes not achievable due to the condition of the patient.
- The trachea should be visible in the midline.
- The scapulae are usually projected in the lung fields.
- Full inspiration is usually not achievable in ill patients; generally, only eight or nine ribs are visualized above the diaphragm.
- Three posterior ribs should be seen above clavicles if the CR angle is correct.
- Clavicles are projected higher and the ribs assume a more horizontal position.
- The heart and great vessels appear magnified.
- A faint image of the ribs and thoracic vertebrae should be visible through the heart shadow
- The outline of the heart and diaphragm should be sharp.
Chest x-ray lateral projection positioning techniques
A lateral chest projection is part of standard x-ray examination of the chest. Although the PA view is the mainstay of diagnosis, it provides a clear view of only about 80% of the lungs; the retrosternal and retrocardiac spaces as well as the posterior sulci are obscured by overlying anatomy. The lateral view clearly displays these areas and is especially useful in detecting lower-lobe lung disease, pleural effusions, and anterior mediastinal masses.
Patient Preparation
Ask the patient to remove clothes from the waist up, put on a hospital gown, remove any jewelry (necklace, earrings), and, if necessary, tie hair up on top of the head.
Patient position
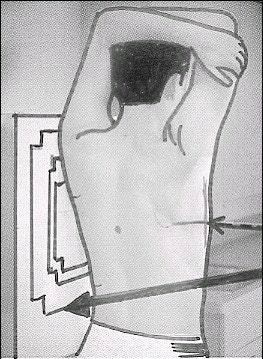 Left lateral chest position. Image courtesy of Dr. Naveed Ahmad.
- Instruct the patient to sit erect or stand upright with their left side against the film cassette or image receptor (IR). A left lateral projection should be performed unless a right lateral projection is specifically requested by the physician. (The left lateral position is preferred because it permits better anatomical detail of the heart.)
- Make sure the patient is upright, with weight distributed evenly on both feet.
- Ask the patient to raise both arms above the head to prevent their superimposition on the chest field.
- Place a lead shield between the x-ray tube and the patient’s pelvis for gonadal protection
Chest position
Adjust the patient so that the left shoulder is firmly against the film cassette, and the lower-left chest wall is no more than 1-2 inches away from the cassette. The goal is to have the midsagittal plane of the body vertical and parallel with the cassette.
- Make sure the patient is not leaning forward, backward, or sideways against the grid.
- Ask the patient to extend the neck, chin, and head upward and vertical.
- Ensure that there will be no rotation in the image by viewing the patient from the tube position.
- When you are ready for exposure, ask the patient to take a deep breath. The patient should then take a second deep breath. (This allows for a deeper inspiration, as more air is inhaled during the second breath than during the first breath.) The exposure is made at the end of the second full inspiration to ensure maximum expansion of lungs.
Central ray
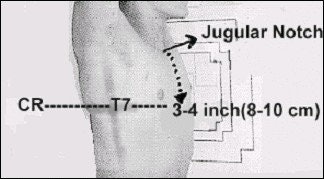 For a lateral projection chest radiograph, the landmark used for locating the center of lung fields is at T7 (mid-thorax). The level of T7 on an average adult is 3-4 inches (8-10 cm) below the jugular notch. Image courtesy of Dr. Naveed Ahmad. Reprinted from Merrill’s Atlas of Radiographic Positions and Radiologic Procedures, 9th edition, Ballinger and Frank, page 550 (figure 10-72), copyright 1999 Mosby, with permission from Elsevier Science.
For a lateral projection, the chest landmark used for locating the center of the lung fields is at the T7 level (mid-thorax). The T7 level on an average adult is 3-4 inches (8-10 cm) below the jugular notch. For patients with an athletic physique, T7 can be as much as 5 inches below the jugular notch. The chest landmark corresponds to the inferior angle of the scapula. The CR should be positioned perpendicular and midline to the film cassette.
Film holder placement
Place the film cassette holder (or IR) crosswise or lengthwise depending on the patient’s physique, using a 14 x 17-inch (35 x 43-cm) IR. Place the IR against the left side of the patient. Adjust the height of the cassette so the upper border is 1 1/2 to 2 inches above the shoulder.
Collimation
The upper border of the illuminated field should be above the shoulders and on each side. It should correspond to the outer skin margins.
Imaging technique
- Film size: 14 x 17 inches (30 x 40 cm) crosswise or lengthwise, depending on the patient’s physique
- Exposure: 110-125 kVp
- mAs: 6
- ML: 35
- cm: 30
Variations
- If the patient is in a wheelchair or cart, ask him or her to sit completely erect, if possible. Otherwise, raise the head end of the cart as much as patient’s condition allows, and then place a pillow support behind patient’s back.
- If the patient is unsteady, place an IV stand in front of them and ask them to grasp the stand as high as possible with both arms. This serves as not only support, but also helps to raise the arms.
- Lateral Decubitus position (ventral or dorsal)
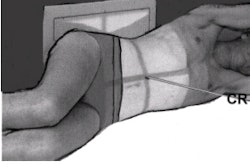
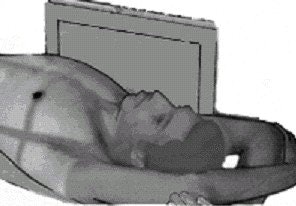 In a lateral decubitus projection, the patient is adjusted in a true supine position with their arms above their head. If the side of pathology is specified, that side should be against the grid. Image courtesy of Dr. Naveed Ahmad.
This position is also called cross-table lateral chest. It is usually requested for patients who are unable to sit or stand upright, and is also helpful to demonstrate air-fluid levels in case of pathology. The patient is adjusted in the true prone or supine position with arms extended above the head. If the side of the pathology is specified, then the affected side should be against the grid.
Evaluation criteria for a good lateral chest projection
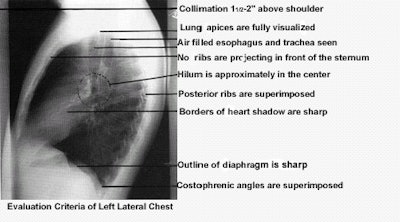
- All of the lung fields, from apices to the costophrenic angles, should be fully visualized.
- The arms should not be superimposed over portions of the lung fields.
- Sharp radiographic outline -- the outline of the diaphragm and lung markings --should be sharp. This can be accomplished by ensuring no motion or breathing is taking place at the time of exposure.
- No rotation (true lateral projection). The ribs should be superimposed posterior to the vertebral column without any separation of the right and left posterior ribs and both costophrenic angles. However, in broad-shouldered patients, separation of the posterior ribs by 1 cm, because of the divergence of the x-ray beam, is unavoidable. Moreover, the lateral aspect of the sternum forms the anterior border, and no ribs should be projecting in front of the sternum.
- No tilt -- thoracic intervertebral spaces and intervertebral foramina should be open, except in patients with thoracic deformities. Tilt, if present, may be evident of closed disk spaces of the thoracic vertebra.
- Hilum should be approximately in the center of the radiograph.
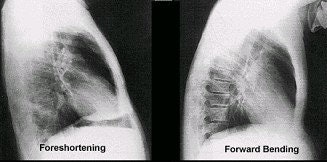 If the patient is leaning against the grid device (foreshortening) or forward bending, there is distortion of all thoracic structures. Image courtesy of Dr. Naveed Ahmad.
AuntMinnie.com contributing writer
November 20, 2001
Copyright © 2001 AuntMinnie.com


