The quadratus lumborum (QL) muscle might be causing your back pain, and you may not even know it. In this segment of our seven-part series on addressing sonographer back pain, we'll explore the often-overlooked QL muscle, and share some exercises that could help relieve your back pain.
The QL plays a prominent role in chronic lower back pain and has become a key player in the subsequent onset of sciatica symptoms and hip pain. Many times these trigger points can cause "referred pain," or problems in the psoas, piriformis, and glutes.
Keep in mind that the QL muscle's role is to stabilize your torso in the frontal plane. If you hold a bag of groceries in your right hand, the left QL contracts, preventing you from leaning to the right and falling over. If you had paralysis in the QL muscle, it would be impossible to walk. It's one of those important muscles that we really don't think about or talk about too much.
The QL also plays an important role in side bending. When you lean to the side, the QL must lengthen and then contract to pull you back up. However, we don't recommended you train that way (e.g., side bends) because of the stress it places on the disks. According to Dr. Stuart McGill, one of the world's leading experts on the back, the QL muscle needs endurance strength and should be trained in a static position, such as with side planks. The overall goal of the QL is to provide lumbar stability.
Over the years, I have seen the QL muscle become problematic for many folks -- and the more we sit, the more problems we have. Not moving enough or properly causes the QL not to work like it should. This can have detrimental physical effects.
When you are walking with some type of load in your right hand, the left QL muscle is firing to help maintain posture, while your right gluteus medius (part of your butt) is working to maintain proper gait. If those muscles become weak, that excessive load can affect other areas of your body such as your knee (patellar tendonitis), because the hips and core cannot stabilize throughout the movement pattern.
When sonographers have right knee pain, we usually find that the right gluteus medius is weak. And since the right gluteus medius works with the left QL, the left QL usually has weakness or "trigger points." In other words, if you have right knee pain, strengthen your left QL. As a result, your right gluteus medius will take stress off the knee.
So, how do you know if you have a weak QL muscle? Perform a side plank and see how long you can hold it. Then compare it to the other side. If you can do 60 seconds on the right side and 30 seconds on the left side, the left is weak and you need to strengthen it. If you find that you need to improve the QL muscle, you can use some of the exercises below to help you get on track. For a beginner, incorporate the following exercises into every program to help strengthen the QL.
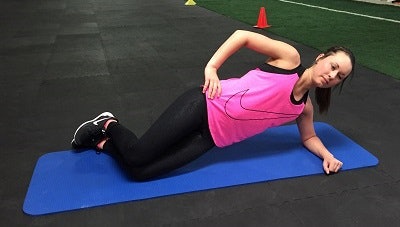
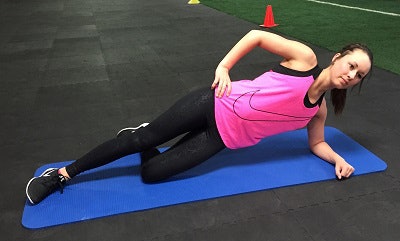
Side planks -- modified No. 1 and No. 2
For the modified side plank No. 1, start in a regular side plank position on the floor and then bend the knees at 90°. Make sure the elbow is right under the shoulder and the body stays in a straight line. Do this plank position for a certain number of seconds for each set. Start easy with one set for 20 to 30 seconds, doing both sides. As you progress, you can build up to three sets of 30 to 45 seconds.
 All images courtesy of Doug Wuebben.
For the modified side plank No. 2, start in a regular side plank position on the floor. Then bend only the bottom knee at 90°, letting the knee and ankle help support. Make sure the elbow is right under the shoulder, and that the body stays in a straight line. Do this plank for a certain number of seconds for each set, progressing just like with modified side plank No. 1.
Do you feel like you are a little more advanced and want to do some additional exercises at the gym or your training facility? Here are a few more movements you can add into your program to help with back pain.
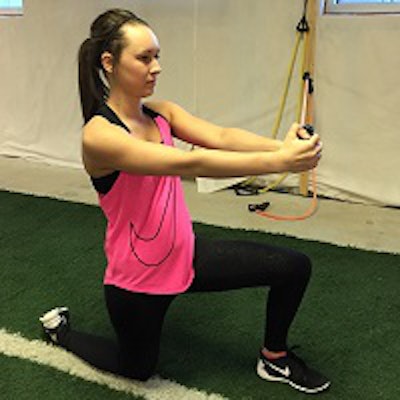
Kneeling Pallof press
You can use a band or cable machine to perform the kneeling Pallof press. First, kneel on the floor or on a pad to cushion your knees. Next, keep tension on the band (i.e., make sure you are far enough away from the weight machine to always have tension, or load, on the band).
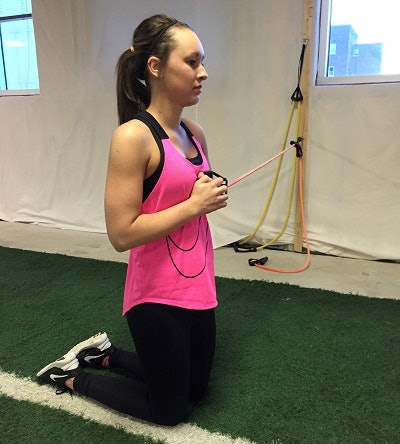
Now do a two-handed chest press, keeping the hands at center mass.
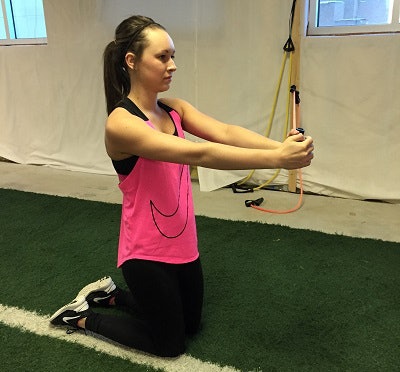
The key is not to let the body rotate. Keep the hips square and control the movement during the concentric and eccentric motion (in and out). A variation of this -- and progression -- is to kneel on one leg and bend the other leg at 90°. Perform the same pressing movement.
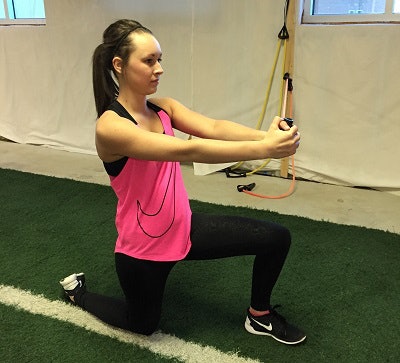
As with any exercise, the key is to make sure you have the correct pattern of movement down before you worry about progression with more weight, a harder band, or different body position (going from kneeling to standing, from two legs to one leg, etc.). Begin with one set of 10 to 12 reps with a weight that you can handle and control your movement. Then build up to three sets of 12 to 15 reps with increased tension.
Bottoms-up suitcase walk
The bottoms-up suitcase walk is very easy to do. We prefer a kettlebell for this exercise, but a dumbbell or even a can of soup or a water bottle will work as resistance.
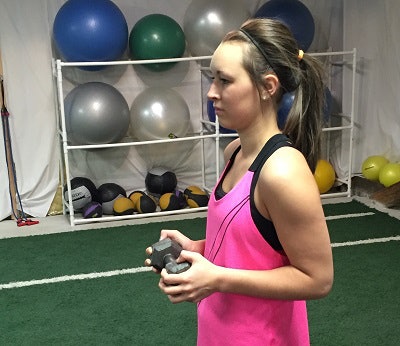
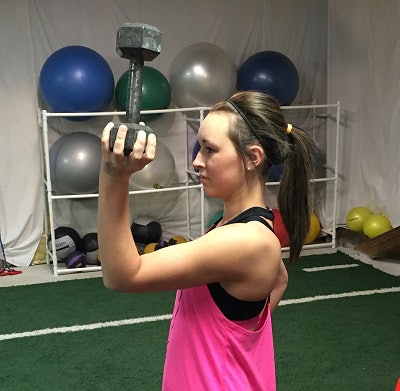
Standing upright, bring the resistance up to shoulder level as if doing a curl. At the top of the exercise, hold the weight in place. Walk for a set distance, return, and switch hands. Be sure to use a weight that you can handle and maintain control of as you move.
To increase intensity, you can hold the weight farther away from the body, keeping the shoulder and elbow both at 90°.
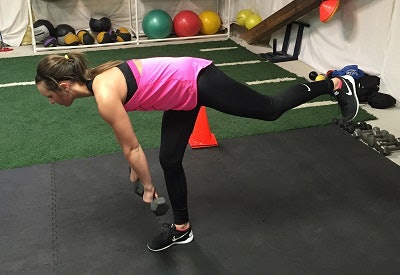
Single-leg Romanian deadlift (RDL)
The single-leg RDL is a hip hinge, not a reach. Unfortunately, many people will make the mistake of reaching with their arm and/or rounding the back in order to achieve a full range of motion. This is incorrect. When performing the single-leg RDL, make sure to hinge through the hips while maintaining a neutral spine throughout the entire movement. As you go down, think "lead with the heel, not bend at the back." This is not a back exercise. Make sure to finish the motion by contracting the glute of the stance (down) leg.
Tennis ball QL release
Lie on your back and place a firm ball under your QL muscle, which is off to each side of your spine in between the top of your pelvis and your bottom rib. Bring the knee that's on the same side as the ball up toward your chest. This puts pressure onto the ball.
Once you feel like you have the right spot (you will feel it!), hold on to your knee and either rock your knee out to the side and then in again and repeat, or repeatedly bend your knee up and down toward your chest.
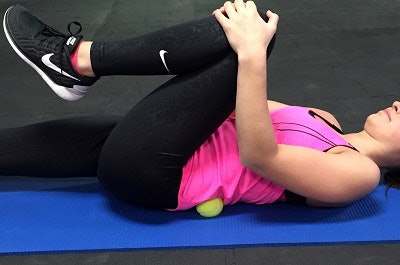
Slowly and gently work into it for one to two minutes on each side and feel free to move the ball up or down slightly to get the right spots. Do this great myofascial release technique once a day for two weeks for longer-lasting results. The other way to prevent this problem from recurring is to strengthen the QL and the surrounding muscle so that they can handle everything that's asked of them.
Causes of QL trigger points
The following factors may activate or reactivate trigger points in the QL muscle:
- Any activity that involves bending and twisting at the waist, such as reaching for an object on the floor, which can overload the QL muscle.
- Lifting heavy or awkward objects such as a patient, especially if it involves twisting at the waist.
- Bending over to put on pants, especially if a foot becomes entangled in the pants and the person loses his or her balance.
- A genetically short leg that causes a lateral tilt in pelvis. Walking or running on a sloping surface such as the side of the road may also predispose the QL muscles to overload and have trigger-point activity.
- A soft bed that sags like a hammock or a memory foam mattress may activate or reactivate QL trigger points by placing the muscle in a shortened or stretched position for an extended period of time.
We hope this helps you improve some or all of your back pain. If not, hold tight as we move on to part 6 and look at how weak glutes can negatively affect your back.
Doug Wuebben is a registered echocardiographer and also a consultant, international presenter, and author of e-books in the areas of ergonomics, exercise and pain, and injury correction for sonographers. He has also been published on the topics of telemedicine and achieving lab accreditation.
Mark Roozen is a certified strength and conditioning specialist, a certified personal trainer, and a fellow of the National Strength and Conditioning Association (NSCA). He also consults, presents, writes, and works with groups, teams, and organizations around the world. He has been in the strength, conditioning, and performance field for over 30 years.
Wuebben and Roozen are co-founders of Live Pain Free -- The Right Moves. Email [email protected] or go to coachrozy.com for more information on programs, training, or speaking requests, or if you have any questions or comments.
The comments and observations expressed do not necessarily reflect the opinions of AuntMinnie.com.
